https://help.ubuntu.com/community/DynamicDNS
Install the inadyn package using Synaptic Package manager, then:
The following will allow your Ubuntu Linux machine to be accessible anywhere that you are given an externally-accessible IP address. This includes most ISPs but excludes many office LANs.
First edit the file /etc/inadyn.conf:
gksudo gedit /etc/inadyn.conf
It should contain something like to the following:
--username myusername
--password mypassword
--update_period 60000
--alias myhost.dyndns.org
--background
Now test that it works by typing
sudo /usr/sbin/inadyn
Next, add inadyn to your 'crontab':
export EDITOR=gedit
sudo crontab -e
Edit the file to add the following additional line:
@reboot /usr/sbin/inadyn
Then save and exit the editor. Verify using
sudo crontab -l
When you reboot, you should see indyn listed when you type
ps -A | grep inadyn
You should be able to log in to your Dynamic DNS provider's website and verify that the DNS entry is being updated. Certainly this is possible with www.dyndns.org, in any case. Alternatively you can type your hostname into a service like [WWW] http://www.dnsstuff.com/.
===========//////
Through DynDns website can be generated the inadyn.conf file which is something like this:
# Basic configuration file for inadyn
#
# /etc/inadyn.conf
update_period_sec 600 # Check for a new IP every 600 seconds
username "mylogin"
password "mypassword"
dyndns_system dyndns@dyndns.org
alias test.homeip.net
Showing posts with label dyndns. Show all posts
Showing posts with label dyndns. Show all posts
Monday, June 02, 2008
Thursday, March 06, 2008
Ubuntu (Gutsy): DynDNS Client Setup
Link to information.
Hello again, this time we’re going to setup a DynDNS client so your computer/server can be reached from anywhere.
Step 1
First, you need to create an account with DynDNS to do so follow this howto: https://www.dyndns.com/services/dns/dyndns/howto.html.
Step 2
First we’ll install ssh and ssh-socket so we can send our DynDNS user and password encrypted instead clear text:
$ sudo apt-get install ssh libio-socket-ssl-perl
Step 3
Install ddclient:
$ sudo apt-get install ddclient
Step 4
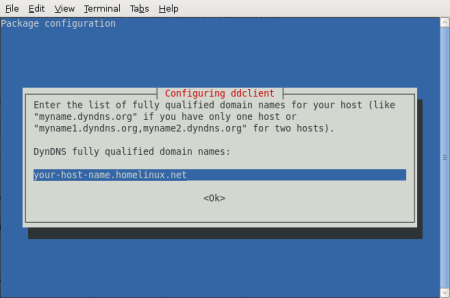
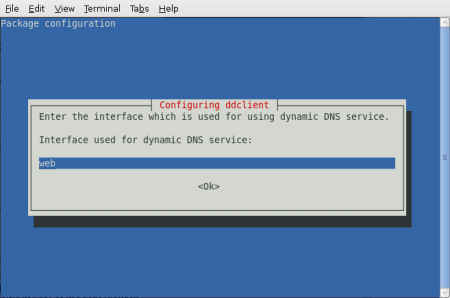
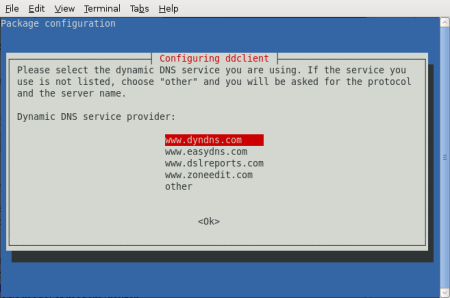
The installation will prompt you some questions. For the first one it ask for your dynamic DNS provider, select www.dyndns.com:
Then, put your fully qualified domain name(s):
Now, your DynDNS requistered username and password:
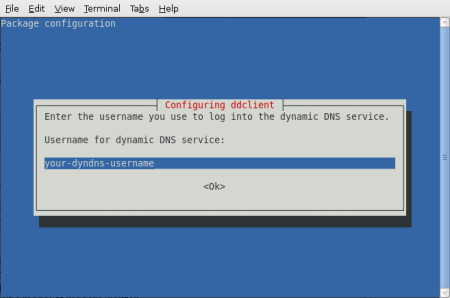
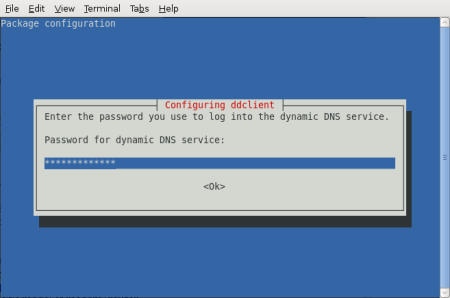
And finally, type “web” as the DynDNS interface to use:
Ok, so long we’ve finished installing ddclient but there’s still more work to do in order to get it working properly.
Step 5
We, need to change the ddclient configuration file (/etc/ddclient.conf) in order to use ssh to send the username and password, and to properly check the IP adrress. From the command line open ddclient configuration:
$ sudo vim /etc/ddclient.conf
In the generated configuration file you’ll probably see something like the following (The parts in italics will be different, the bold parts are going to change so special attention on this):
# Configuration file for ddclient generated by debconf
#
# /etc/ddclient.conf
pid=/var/run/ddclient.pid
protocol=dyndns2
use=if, if=web
server=members.dyndns.org
login=your-dyndns-username
password=‘your-dyndns-password’
your-host-name.homelinux.net
Step 6
We need to change the configuration so ddclient get our public IP address properly, and to send our username and password over ssh.
DynDNS has a web interface to get your public IP address, this is equivalent to manually invoking http://checkip.dyndns.com/. But we need to properly configure this interface, so change the line use=if, if=web for the following:
use=web, web=checkip.dyndns.com/, web-skip='IP Address'
Second, add to your configuration file just below the initial comments the following:
ssl=yes
daemon=300
The above two lines tells ddclient to use ssl for its connection and to update your public IP address every 5 minutes (specified in secconds).
Step 7
Now, we must make sure that ddclient is set to run as a deamon. Edit /etc/default/ddclient:
$ sudo vim /etc/default/ddclient
And make sure that:
# Configuration for ddclient scripts
# generated from debconf on Tue Jan 29 20:23:32 CST 2008
#
# /etc/default/ddclient
# Set to “true” if ddclient should be run every time a
# new ppp connection is established. This might be useful,
# if you are using dial-on-demand
run_ipup=”false”
# Set to “true” if ddclient should run in daemon mode
run_daemon=”true”
# Set the time interval between the updates of the dynamic DNS name in seconds.
# This option only takes effect if the ddclient runs in daemon mode.
daemon_interval=”300″
Step 8
Finally, restart your ddclient and if no error is printed you’re good to go:
sudo /etc/init.d/ddclient restart
Port Forwarding
In order to deliver services on the net, you must open the corresponding ports for the services that your computer/server will provide, this is called Port Forwarding. Unfortunately this howto does not cover that topic. To do so you can visit http://www.portforward.com/routers.htm, where you can read how to port forwarding for your specific model of modem/router.
Happy hacking!

Tuesday, December 11, 2007
DynDNS and the ddclient
https://www.dyndns.com/support/clients/unix.html
In the ddclient.conf file I have:
###=============
daemon=300 #300 # check every 300 seconds
syslog=yes # log update msgs to syslog
mail=acardh #mail=root # mail all msgs to root
mail-failure=acardh #root # mail failed update msgs to root
pid=/var/run/ddclient.pid # record PID in file.
#ssl=yes # use ssl-support. Works with
# ssl-library
use=web
protocol=dyndns2
server=members.dyndns.org
login=acardh # default login
password=******** # default password
server=members.dyndns.org, protocol=dyndns2, acardh.homelinux.org
##===============================
My complete ddclient.conf is here (restricted access).
In the ddclient.conf file I have:
###=============
daemon=300 #300 # check every 300 seconds
syslog=yes # log update msgs to syslog
mail=acardh #mail=root # mail all msgs to root
mail-failure=acardh #root # mail failed update msgs to root
pid=/var/run/ddclient.pid # record PID in file.
#ssl=yes # use ssl-support. Works with
# ssl-library
use=web
protocol=dyndns2
server=members.dyndns.org
login=acardh # default login
password=******** # default password
server=members.dyndns.org, protocol=dyndns2, acardh.homelinux.org
##===============================
My complete ddclient.conf is here (restricted access).
Subscribe to:
Posts (Atom)